Need assistance?
How to get started and get the best use out of your TECMEN TM1000
So you've bought a new TECMEN welding helmet (good choice) and now it's time to learn all about it. Watch this video to learn about the different functions, how to change the filters, charging the battery and more...
How to best use a TECMEN 1000 Respirator Welding Helmet
As you probably noticed, the TECMEN 1000 is a flip front respiratory helmet with grinding and auto darkening lens. It also includes side windows to give you a 150° field of vision . This helmet is designed not just for welding and grinding, but to be worn whatever you're doing, all day long. With comfortable headgear, and clean, cool, fresh air, you don't need to take the helmet off while in the workshop, so you'll always be protected from the nasties that are especially prevalent in metalworking workshops!
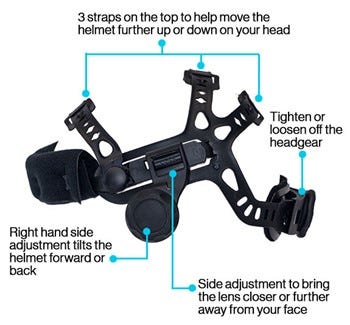
Adjusting the Headgear
The TECMEN 1000 headgear has 4 different adjustment points to make sure you stay comfortable all day.
- Use the side adjustment to bring the lens closer or further away from your face.
- 3 straps on the top to help move the helmet further up or down on your head. This helps with your vision, and also stops the helmet hitting pressure points on top of your head.
- The right hand side adjustment tilts the helmet forward or back.
- The adjustment at the back of the headgear works to tighten or loosen off the headgear. The comfort pad at the back helps add that extra bit cushioning comfort.
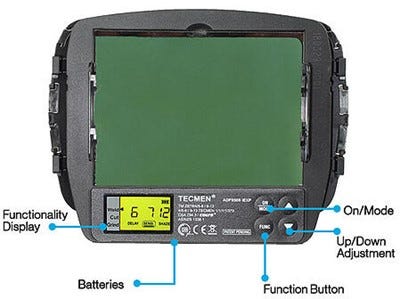
TECMEN Auto-Darkening Controls
You can use the controls on your auto-darkening lens while the helmet is on. Simply flip the lens up slightly so you can reach under to the adjustment buttons.
- The batteries are at the bottom.
- On/mode, function and up and down adjustments are on the right side.
- Delay, sensitivity and shade displays are on the left.
Functionality
Your auto-darkening lens has the following functionality. We'd recommend starting with a high setting and relaxing it off once you get going depending on your preferences.
- Delay - the delay after you’ve finished welding.
- Sensitivity - how sensitive the lens is to the different arcs.
- Shade - depending on the type of welding you’re doing, which shade is best.
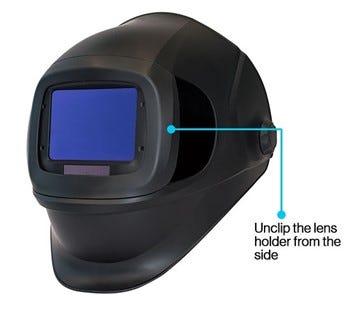
Changing the Lens
The clearer your vision, the better your job’s going the be. To change the lens:
- Unclip the lens holder on the side
- The filter can pop up and out
- There are 3 tabs on either side
- Click out the top
- Pull out the old lens gently
- Clip the new lens in on either side
- Drop the lens back into the helmet, push it in and then down and you should feel it click into place
- Clip the lens holder back into place
This process works for both the auto darkening lens and the grinding lens.
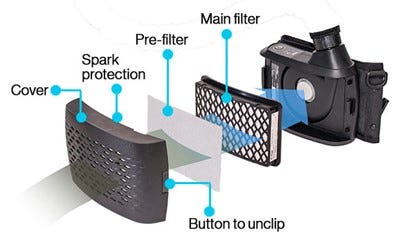
Operating the FreFlow Respirator Unit
Check your filters by clicking them off at the side of the unit:
- First is the main filter which can pop out
- Under this is the pre-filter, and then the spark protection.
- Make sure the spark protection is always in there
- Pre-filters should be changed often and kept clean to protect the main filter.
- Once changed, just click everything back into place.
Battery
- The battery is located at the bottom of the unit.
- To remove, press on the button at the front and slide the battery forward. It should then drop out.
- The battery is charged through a small hole on the bottom right side.
- The battery should be removed from the unit to charge.
- Red light means it is charging, Green it is just about charged. It’s best to leave it on for 30 minutes once green to make sure it is fully charged.
- Just slide and click the battery back in place once charged.
Respirator Control Panel
- To turn the unit on, hold down the on/off switch for a few seconds.
- Next to the on/off switch are the battery, fan speed and filter indicators.
- Press the on/off switch quickly once and it will adjust the fan speed.
- Press and hold the on/off switch to turn the unit off.

Connecting the PAPR
Here's how to fit the respirator unit to the helmet:
- Clip the should straps to the respirator unit. These act like a backpack to help balance the weight of the unit.
- Attach the fire retardant air-hose to the respirator unit. Drop the hose into the unit and turn to clip into place.
- Now attach the other end of the hose to the helmet. Line up the lugs, drop in and twist to clip into place. Then clip the hose into the back of the headgear for better balance.
- Once everything is attached, go ahead and put it on:
- Put on the respirator straps, then attach the belt and tighten to suit.
- Now add the helmet and you’re ready to go.