 Need assistance?
12 common drilling problems and how to avoid them
It always looks so easy when someone else drills that perfect hole. They quickly selected the right drill bit, swiftly attached it to the drill, turned it on, drilled through the metal, and BAM, the hole is formed!....Then you give it a go and the reality is a little different to what you just observed. We've listed 12 of the most frequently reported drilling issues and how to avoid them. Read on to see if any of these could be you...


Troubleshooting Guide
1. The drill bit broke
It could happen to anyone. You're drilling through that metal piece and ...SNAP!... your drill bit is no more...
Why does it happen and how can I avoid it?
- Speed & Binding up – Smaller drill bits (1-5mm) are generally used at higher RPM compared to larger diameter drills. If used at too higher speed it could result in binding and then breaking
- End of the hole – When drilling especially larger diameter holes it’s important to reduce the force/pressure when you get towards the end of the hole. Otherwise it can result in binding and snapping the drill bit.
- Flutes are clogged with chips - use a jobber drill with wider flutes and/or consider using polished flutes. Withdraw the drill at regular intervals to clear any chips out. If chips are not broken up, consider heavier feeds or a chip breaker design.
- Outer corners are worn - check your speed and coolant. Inadequate or incorrect coolant could cause excessive run out as the drill enters the metal.
- Work is not held securely causing slipping - clamp it down, or use adequate holding equipment to keep the job still.
- Using excessive feed - reduce your force/pressure.
- An improper point is being used - correct for the application.
- Twist drill is too dull - re-sharpen or replace it.
- Using a cheap jobber drill that's not made right - always buy quality.
2. My drill bit's slipping
Do you find your chuck isn't holding your drill bit tight enough?
Too loose? How can I secure it?
- Do you have a standard round shaft drill bit? - try using a drill bit with 3 flats on the shaft for better grip.
- Make sure the drill chuck is tight
- If the drill bit is continuing to slip maybe the chuck is worn out.
3. The chips aren't breaking up
This can be extremely frustrating! Chips that don't break properly can become long and stringy and wrap themselves around the tools, meaning you have to stop work to detangle them frequently.
What's the cause? How do I stop it?
- Insufficient feed - increase your force/pressure.
- Blunt - maybe the drill needs sharpening.
- Improper style of jobber drill and/or point used - adjust.
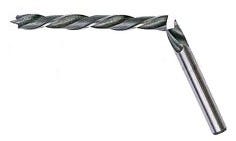
4. My point angle is damaged
Got a damaged point that just isn't doing the job it used to?
What happened? How can I fix it?
- Dropping or mishandling the jobber drill - be careful so as to not damage the drill tip.
- Sharpen – it’s important to make sure the drill bit is kept sharp. Otherwise it can lead to heating the metal that you’re drilling.
5. The hole's a bit....big
You used the right sized drill bit, but hmmm....the hole you made seems to be a little oversized...
What's the go? What do I do?
- Pilot hole & Dot-punching – When drilling a hole generally anything larger than a 6mm diameter it’s good practise to either dot-punch then drill a pilot hole with a smaller drill bit. This helps to keep the drill bit central without elongating the main hole.
- Drill point is off centre - re-point by sharpening or replace for accuracy.
- Machine spindle is not rigid or is not running true - adjust.
- Work piece was loose and/or vibrating - tightly secure the work.
6. Ooooo that's rough!
No one wants a hole that's rough around the edges!
Why is it rough, and how can I smooth it?
- Dot-Punch and drill Pilot hole – by doing this it will keep the drill bit central on the hole, minimising the possibility for it to wander.
- Incorrect point grind and/or a dull drill bit - repoint or replace the jobber drill.
- Excessive feed - reduce the feed.
- Incorrect or insufficient coolant - correct. It helps make a clean hole as well as keep the drill sharp for longer. Click here for a popular drilling coolant/fluid
7. My drill bit blunts too quickly!
Wondering why your drill bit isn't lasting all that long? You can give them a longer life!
What's killing my drill bit? How do I fix it?.
- Coolant (drilling fluid) not reaching the drill point, or not enough coolant used - check your coolant.
- Too much speed, or not enough feed - review and adjust.
- Wrong type of point and/or drill for the application - don't be lazy, use the right point and drill for your application
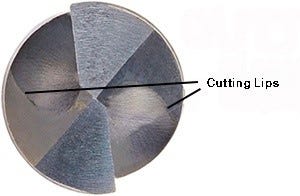
8. Chips on the lips
No, we're not talking about lunch. We're talking about chipping occurring on the lips of your drill bit - basically your jobber drill is breaking down.
How is this happening?
- Too much lip clearance (over 15°) will cause cutting lips to break down - re-point/sharpen or replace the drill.
- Lip Clearance Not enough clearance (under 9°) requires added feed pressure which can cause the drill to split up the web - re-point, or replace the drill.
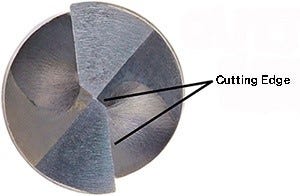
9. Chipping on my cutting edge
Chips on the cutting edge of your drill bit won't be giving you a good job!
What's the cause? How do I fix it?
- A large run out after the drill was attached or a loose chuck - check your chuck, adjust or choose another one.
- Excessive cutting speeds or feeds - reduce speeds and/or feeds.
- Drilling fluid/coolant – make sure you use drilling fluid as it will reduce wear. Here is a popular drilling liquid
10. Breaks in the outer corners
Now you know something's wrong when this happens!
What's going on? How do I avoid it?
- Insufficient or incorrect coolant - check and adjust.
- Excessive speed - slow down!
- Scale or hard spots in/on the metal - sorry, this is relatively unavoidable.
11. My drill bit's wandering
Jobber drills that wander can snag/gouge your work...
What's the problem? How can I stop it?
- Dot-Punch and drill Pilot hole – by doing this it will keep the drill bit central on the hole, minimising the possibility for it to wander.
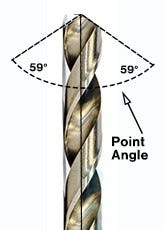
- Using a standard 118° drill bit and/or; - use a split-point drill bit
- Not enough friction on the work surface - use a split-point drill bit for better grip and reduced wandering.
12. Make my drilling faster!
Did you know different drill points can affect your drill speed?
Why so slow? How can I improve it?
- Are you using a standard 118° point drill bit on metal? - try using 130° split-point drill bits for faster, more precise drilling.
- Drilling fluid/coolant – make sure you use drilling fluid as it will reduce wear and minimise heat build-up. Here is a popular drilling liquid

-
 17 troubleshooting tips for threading with metal cutting taps
Having issues with your threading? Not sure what's going wrong? Rea...
Read more -
 These are the best selling Mag Drills...find out why!
Introducing the Evolution ME42 Magnetic Drill and the Euroboor Low Profi...
Read more -
 Exclusive to Euromarc - ELITE drills
Experience an all new drilling sensation with our ELITE drill range. Exc...
Read more